LogoLogo
  • Welcome to WorkSpaces Manager
  • Overview
    • Change Log
      • Stable
      • Beta
    • Portal Requirements
      • Software Requirements
      • Hardware Requirements
    • Installation Prerequisites
      • Active Directory Service Account
      • Amazon WorkSpaces Cost Optimizer
      • CloudWatch Log Group & Eventbridge Rule
      • Port Requirements
      • AWS Service Endpoints
    • Installation Procedure
      • Subscribe to WorkSpaces Manager License Key
      • Request a License Key
      • Subscribe to WorkSpaces Manager Appliance
      • Deploy WorkSpaces Manager Appliance via CloudFormation
      • Configure WorkSpaces Manager
    • Upgrade Procedures
      • From Version 5
      • WSM Update Tool
      • Latest Version Updates
    • Alternate deployment options
      • Install manually on EC2
      • Deployment from Shared AMI
        • Security Group
        • IAM Requirements: Custom Policies
        • IAM Requirements: Role and EC2 instance profile
        • Shared AMI (Amazon Machine Image)
      • Create AMI via Packer
      • Deploy an RDS Database via Terraform
    • WorkSpaces Performance Monitor Agent
    • High Availability (HA)
    • Appendices
      • Administrator Active Directory Permissions
      • SES Configuration
      • HTTPS/TLS Encryption
      • Friendly Portal URL Address
      • GPO and values for WorkSpaces Performance Monitor Agent
      • GPO and value for Disconnection after idle time
      • IAM Policies in JSON format
      • AWS CLI v2
      • LDAP (Active Directory) Troubleshooting for WSM
      • RDS Database Options
Powered by GitBook
On this page
  1. Overview
  2. Appendices

Friendly Portal URL Address

A portal URL address is a web link that provides access to a specific online platform or resource. DNS (Domain Name System) translates human-readable domain names (URLs) into IP addresses.
PreviousHTTPS/TLS EncryptionNextGPO and values for WorkSpaces Performance Monitor Agent

Last updated 6 months ago

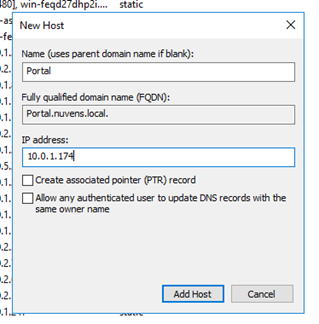
This section explains how to set up access to the WorkSpaces Manager portal using your registered domain. Instead of accessing the portal via the instance's IP address, you can add a DNS record to your domain. Here's how to configure it:

  1. Open DNS Manager: Access your DNS management console, which is typically provided by your domain registrar or internal DNS service.

  2. Add an A Record:

    • In DNS Manager, add a new A record to your domain.

    • Set the hostname (e.g., portal.yourdomain.com) as the subdomain for accessing the WorkSpaces Manager portal.

    • Reference the IP address of the WorkSpaces Manager EC2 instance in the record.

  3. Save and Apply: Save the DNS changes. It may take some time for the new DNS record to propagate.

Once the DNS record is active, you can access the WorkSpaces Manager Portal via the friendly domain name (e.g., portal.yourdomain.com) instead of the instance’s IP address.

Once you have configured a Load Balancer, you will need to:

  1. Add a CNAME Record:

    • In your DNS Manager, add a CNAME record for your domain (e.g., portal.yourdomain.com).

    • Set this CNAME to reference the DNS name of your Load Balancer.

  2. Reference the Load Balancer's DNS Record:

    • For example, if your Load Balancer’s DNS record is lb-1234567890.us-west-2.elb.amazonaws.com, you would use this as the target for the CNAME.

This configuration will ensure that when users access portal.yourdomain.com, they are directed to the Load Balancer, which distributes traffic to your EC2 instances hosting the WorkSpaces Manager portal.

This setup will now allow you to reference the portal using a friendly domain name. In this scenario, we have used , but make sure to use your own domain in place of "Nuvens."

http://portal.nuvens.cloud